Refactor Code with OOP(2) : Inheritance and Polymorphism
The written content was created by referencing materials from the Unity Learn website.
Relationship between Inheritance and Polymorphism
Inheritance and polymorphism are deeply intertwined. Inheritance, much like the name implies, focuses on parent-child relationships between different object. Polymorphism is a result of inheritance, and refers to the process of a child class modifying what it inherits from a parent class. Used together, inheritance and polymorphism can reduce the amount of code you have to write in an application.
What is Inheritance?
Inheritance is the process of creating a primary class (also known as a parent class) form which other classes (called child classes) can be created. A child class takes on, or inherits, all of the features of the parent class automatically. It’s common to have different classes share similar features in an application.
For example, a video game may feature many different types of enemy classes, but they are likely to share the same core features, such as managing their own health and the ability to deal damage to the player. With inheritance, the need to write that health and damage functionality for each individual enemy class is eliminated, so that we can focus on writing functionality that’s unique th each class.
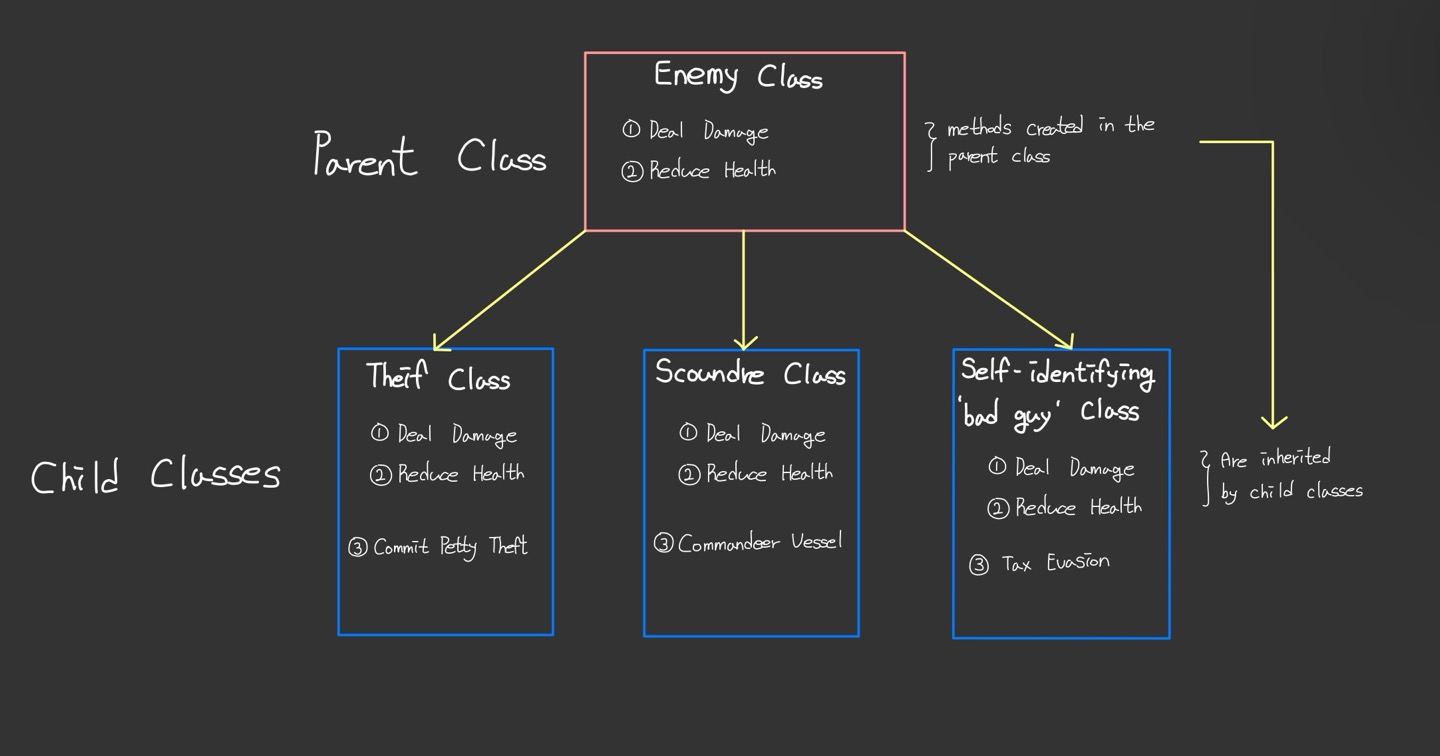
We’ve already been making use of inheritance with every script we’ve written in Unity so far. By default, whenever we create a new class, it inherits from MonoBehaviour :
1
public class SomeClass : MonoBehaviour {}
MonoBehaviour is the base class from which all core Unity scripting functionality inherits. Without MonoBehaviour, we wouldn’t be able to call OnTreggerEnter, GetComponent, or even use Start or Update.
In the diagram above, it might appear that all of the child enemy classes would lose their ablilty to access Unity functionality, because they exchanged their inheriting class from MonoBehaviour to Enemy. Fortunately, since the Enemy class inherits from Monobehaniour, the children of the Enemy class are also considered children of MonoBehaviour!
What is Polymorphism?
Althought inherting core functionality from a parent class can be helpful, there are many situations where we don’t want the child class to perform exactly the same action as the parent class. Polymorphism allows we to change the functionality of what an object inherits from its parent class.
1
2
3
4
5
6
7
public class Enemy : MonoBehaviour
{
  public void DealDamage ()
  {
    Player.Health -= 10;
  }
}
In the above example, the Enemy class has a DealDamage method that removes 10 points from the Player’s health whenever it’s called. The Theif class, a child of Enemy, can call this method without declaring it in the class.
1
2
3
4
5
6
7
8
9
10
public class Thief : Enemy
{
  private void Update()
  {
    if (Player.isSeen)
    {
      DealDamage();
    }
  }
}
This is fine if we want the Thief to deal exactly the same amount of damage as the Enemy class, but what if we wanted it to be a different value? These changes are accomplished through the process known as method overriding.
The method that we want to override in the parent class must first be marked for overriding. This is done by making it a virtual method :
1
2
3
4
5
6
7
public class Enemy : MonoBehaviour
{
  public virtual void DealDamage ()
  {
    Player.Health -= 10;
  }
}
Identifying a method as virtual indicates that it can, but doesn’t have to, be overridden. This is ideal for the current example, because while the Thief child calss may need to modify the DealDamage method, another child class, such as the Scoundrel class, may not.
Once DealDamage is set to virtual, the Thief class can override it by creating its own method for DealDamage. Here, instead of virtual we’ll use the override notation. We can now add new functionality into the method specifically for the Thief class :
1
2
3
4
5
6
7
8
9
10
11
12
13
14
15
16
public class Thief : Enemy
{
  public override void DealDamage()
  {
    Player.Health -= 2;
    CommitPettyTheft();
  }

  private void Update()
  {
    if (Player.isSeen)
    {
      DealDamage();
    }
  }
}
This Thief class now deals a smaller amount of damage than the parent Enemy class, and also calls one of the Thief-specific methods. Now, when DealDamage is called in Update by a Thief object, the customized DealDamage method will be called instead of the parent method.
Implement Inheritance and Polymorphism in the Project
Now, We’re going to create a new C# script and name it ProductivityUnit. To make the ProductivityUnit class inherit from Unit, remove MonoBehaviour from the class declaration and replace it with Unit.
1
2
3
4
public class ProductivityUnit : Unit
{

}
And we can see the error in our script that says : ‘ProductivityUnit’ does not implement inherited abstract member ‘Unit.BuildingRange()’.
If we look in Unit.cs, we can see the following code :
1
protected abstract void BuildingInRange();
Unlike virtual methods for which overriding is optional, this method uses the abstract notation, which indicates that is must be overridden. Abstract methods are useful when you recognize that all child classes will need a certain type of functionality, but that functionality should be coded separately in each child class.
In this case, BuildingRange is meant to manage everything that happens when a unit in interacting with a resource pile (which is a child of the building class), but what occurs will change based on which child class calling the method.
So, back in ProductivityUnit.cs, all we need to do is override that method :
1
2
3
4
protected override void BuildingInRange()
{

}
Override the BuildingInRange method
To complete the BuildingInRange method, we’ll need a variable that will keep track of any resource pile that the user has selected. At the top of the class, create a ResourcePile variable named m_CurrentPile and set it to null. We’ll also need a float that will define by what amount the resource productivity should be increased :
1
2
3
4
5
public class ProductivityUnit : Unit
{
  private ResourcePile m_CurrentPile = null;
  public float ProductivityMultiplier = 2;
}
Return to the BuildingInRange method to code what happens when the productivity unit is in range of a resource pile. This code will run every frame. We want the production speed to increase during the frame when the productivity unit comes within range of a Building that is a resource pile. Then we want to prevent this code from running in the next frames, or else the production speed will keep increasing!
1
2
3
4
5
6
7
8
9
10
11
12
13
protected override void BuildingInRange()
{
  if (m_CurrentPile == null)
  {
    ResourcePile pile = m_Target as ResourcePile;

    if (pile != null)
    {
      m_CurrentPile = pile;
      m_CurrentPile.ProductionSpeed *= ProductivityMultiplier;
    }
  }
}
The notation “as ResourcePile” sets the pile variable to m_Target only if m_Target is a ResourcePile type. If m_Target is a Base, these types won’t match, and pile will be set to null. This is an efficient way of checking whether m_Target is a resource pile. If it is (pile != null), then m_CurrentPile is set to that resource pile, and its ProductionSpeed is doubled.
On the next frame, the if statement at the top of the method will prevent this code from running again, because m_CurrentPile will be set to a value (the resource pile).
One other interesting thing to note in this code is that we were able to access the m_Target variables, which is a “protected” variable in the parent Unit class. Protected variables are like private variables, but they can also be accessed by any child classes - we were only able to access it because ProductivityUnit.cs derives from Unit.cs
Understand Overloads
To finalize the productivity unit, you need to make the resource pile’s production rate return to its previous value as soon as the unit leaves, as is descrived in the brief. In the Unit class, this is managed by the GoTo method - but there are two methods that have this name :
1
2
3
4
5
6
7
8
9
10
11
12
13
14
15
16
17
public virtual void GoTo (Building target)
{
  m_Target = target;

  if (m_Target != null)
  {
    m_Agent.SetDestination(m_Target.transform.position);
    m_Agent.isStopped = false;
  }
}

public virtual void GoTo (Vector3 position)
{
  m_Target = null;
  m_Agent.SetDestination(position);
  m_Agent.isStopped = false;
}
Methods can’t share names. In most cases this is true, except for the special circumstance, which is referred to as method overloading. Notice that the both GoTo methods have different parameter types, and have different functionality. Method overloading effectively makes a single method multi-purpose. When the user selects a target, this paif of overloads will handle the navigation depending on the type of object they selected.
The first GoTo method takes a Building class as a parameter, which is collected when the user right-clicks on a resource pile or on the base. This parameter is then passed to the SetTarget method in the Unit script.
The second GoTo method takes a Vector3 parameter, for situations when the user selects a random point rather than a resource pile.
Override the GoTo methods
The productivity unit needs to check and see if it’s currently working on a resource pile and then, if it is, perform what occurs in the base GoTo method and return that resource pile’s production output back to its original value before moving away.
Let’s override the GoTo methods in ProductivityUnit script.
1
2
3
4
5
6
7
8
9
10
11
12
13
14
15
16
17
18
19
20
void ResetProductivity()
{
  if (m_CurrentPile != null)
  {
    m_Currentpile.ProductionSpeed /= ProductivityMultiplier;
    m_CurrentPile = null;
  }
}

public override void GoTo(Building target)
{
  ResetProductivity();
  base.GoTo(target);
}

public override void GoTo(Vector3 position)
{
  ResetProductivity();
  base.GoTo(position);
}
The base label tells the script to run the original method in addition to the new code in this override method. These methods will run as soon as the user selects a new location for the productivity unit. Before moving, it will return the production speed of the current pile back to its original rate, if a productivity pile was currently selected.